

The Call Queues icon as seen will take you to the Call Queues center.

A Call Queue is a place holder for calls to sit waiting to be answered. A call queue can be configured to ring multiple devices in a certain order or a parking lot for a call to wait until someone retrieves the call. To navigate to the Call Queues center, select Call Queues from the manager portal navigation icons. If the domain has any Call Queues configured, you will see them displayed here.

You will be taken to the Add a Call Queue window Basic tab as seen in the figure. To
add a call queue
to
the domain,
click the Add
Call Queue
button as seen.


The basic tab will ask you for basic information needed such as the name you would like to give the queue and extension number. The Extension number cannot be changed once the queue is created.

Ring Type controls how the call is sent to specific devices. Calls are sent to specific devices instead of users so their Answering Rules will not route to an undesired destination.

Routes callers to the available agent that has been idle the longest so the agents that has not received a call in the longest amount of time will receive the call.
Simultaneously rings all available extensions in the queue. The first agent that answers gets connected with the caller.

Linear Hunt calls agents in a predefined order. The order is defined when editing the queue agents after the queue has been created.

Linear Cascade routes calls to groups of available agents in a predefined order. The order is defined when editing the queue agents after the queue has been created.

Call Park allows users to send callers to an extension to wait until the call is retrieved by the person sending the call to the parking lot or by another user on the system. Selecting Call Park will not display Pre Queue Options or In Queue Options. Nor will the options to select a phone number for direct dialing, recording calls, or collecting statistics.

You can select a phone number that will route directly to the Call Queue being created if your organization has any available phone numbers.


Setting Record calls to Yes will record all calls that are routed through the queue being created.

This option will collect statistics for the queue being created and provides information to the Call Center Supervisor.
Message to Agent
After the queue is created you can click the edit icon and the option to record a message that will be played to the agent every time the agent answers a call from the queue will appear.

If you select any other ring type than Call Park the Pre Queue Options tab will appear as seen in the figure below. The Pre Queue Options are a set of conditions that must be met before the queue will accept the call. If any of the conditions are not met the call will be forwarded to the destination in the Forward if unavailable field.

Enabling Require Agents will configure the queue so agents must be signed in or the call will be forwarded to the Forward if unavailable destination.
Require intro MOH
Setting Require intro MOH (Music on Hold) will play the first recording
in the Music on Hold directory of the queue to the caller
when they enter
the queue.
Max Expected Wait allows you to cap how long the hold time can last for callers. If you set a time and the Max Expected Wait time is exceeded for a new caller entering the queue the caller will be sent to the destination entered into the Forward if unavailable field.

Allows you to set a cap of how many callers the queue can have waiting at one time. If a Max Queue Length is set and a caller attempts to join the queue it will forward them to the destination entered in the Forward if unavailable field.

The Allow Callback options allow for callers entering the queue to save their place in the queue and receive a call from the system when an agent is available.

The Forward if unavailable option forwards calls to the destination entered if the queue has reached its expected max wait or the max queue length limit has been reached. Clicking next will take you to the In Queue Options tab.

The In Queue Option tab as seen in figure below allows you to control how the call is handled if the call meets all Pre Queue Options and the call is accepted into the queue. This tab will change based on the ring type selected.

Queue Timeout is a time limit that can be set for how long a call will remain in the queue before being forwarded to the destination entered into the Forward if unanswered, or voicemail of the queue. Moving the blue bar to the right will increase the amount of time in 5 second intervals. Move all the way to the right for unlimited which will permanently keep the call in the queue until someone answers or the call disconnects.

Agent Ring Timeout allows you to configure how long each agent in the queue phone will ring before moving onto the next agent. This option will not display if the call type of the queue is Ring All.

This option will appear if Linear Cascade is the selected call type. This adds an additional group of agents to ring when the Agent Ring Timeout is reached. The queue will ring the first group of agents and added agents with the chosen order or lower to simultaneously ring. You will see the option to assign an order to the agents after the queue is created on the Edit Agents page under the Order in Linear Hunt option that appears.
For example, if you chose 5 for Initial Agent Group to Ring and 5 for this option it will now ring all agents with the Order of 10 or lower. It will add 5 and ring all agents with that Order or lower on every Agent Ring Timeout that is reached. You will see the option to assign agents an order after the queue is created.

Logout agent on missed call option as seen to the right in figure below will log an agent out of the queue if a call from the queue goes unanswered.


Forward if unanswered option as seen allows you to enter a destination for calls that are not answered. This could be another user’s extension number or another phone number.

Enabling Voicemail will create a voicemail box for the queue and allow callers to leave a voicemail if no Forward if unanswered has been set.

Clicking Save will create the Call Queue. You will then see the call queue displayed with your other call queues. To the right of the queue name and extension you will see the ring type selected for the queue and an overview of how many callers and agents are in the queue. You will also see the options to Add Agents, Edit the Music on Hold, Edit any of the options selected when creating th queue excepts for the name or extension number, and delete the queue.

The Edit Agent icon will take you to the Edit Agents page as seen in figure below. Here you can add agents to the queue, modify if they are able to receive calls, and how many calls they can receive at one time.


The Agent Phone field is where you enter the device of the agent you want to receive calls from the queue. You add an agent’s specific phones that you want to ring and not users. The user's answering rules do not control how the call is routed rather than how the queue options are configured to route the call.

The Status has two options = Online and Offline. If an agent is online they are able to receive calls from the queue. Offline will add the user, however, they will not be sent queue calls. This is useful when you want to assign Call Center Supervisors to a queue that you want them to manage but not take calls from.

Wrap Time will not send the agent another call from the queue until that threshold has been reached.

Max Simultaneous Calls allows you to configure if the agent can receive multiple calls from the queue and how many total they can receive at one time.

Order in Linear Hunt assigns the call queue agent to that position in the linear hunt order to ring.

If an agent is being added to multiple queues, Queue Priority decides which queue will ring the agent when calls are waiting in multiple queues for the agent to answer.

Will inform the agent they are receiving a call from the queue and they can press 1 to accept the call. If calls are routed to an off-net number and request confirmation is not enabled, tvoicemail could answer the call, preventing the call from going to the next agent in the queue.

Auto Answer will have the call automatically answered by the phone being sent the call.

The Save Agent button will add the agent’s phone to the devices that will ring when there is a call in the queue. After adding the agent's device you can change any of these options by clicking the Edit icon as seen in the figure below. You can also remove the agent’s device by clicking the delete icon.


To the right of the Edit Agent icon on the Call Queues center page is the Edit Music on Hold Icon. Clicking the Edit MoH will take you to the queues Music on Hold directory as seen in figure below.
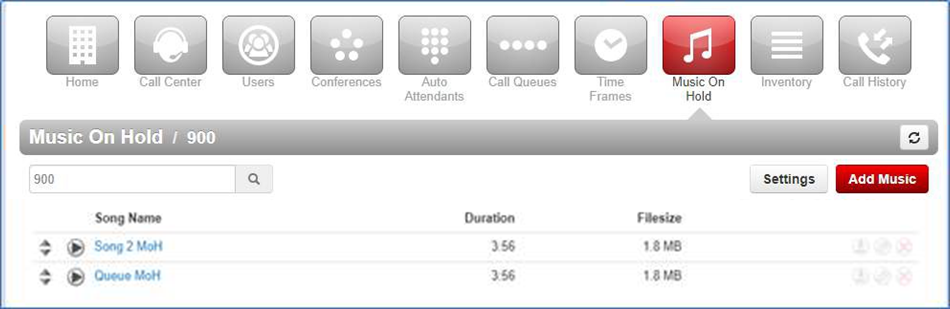

Here you can Add Music by clicking the Add Music button as seen in figure 5.6.7.1. The audio file must be in .wav or .mp3 format. Name the hold music and click upload. The music will be played in a top to bottom format or randomized order, depending on what was selected when the domain was created. You can reprioritize the order of the music by dragging and dropping it.

Clicking the Settings button will open the Music on Hold Settings window as seen in figure below and will allow you to configure the queue with an Introductory Greeting. This message will be played to every caller before they are connected with an agent. You can upload an introductory greeting or have the system call you to record one. Name the greeting and click Save.


To the right of the Edit MoH icon is the Edit Queue option as seen in the bottom right below. Here you can change any of the configuration options by clicking the name of the queue or the Edit icon.

To delete a queue click the Delete icon option as seen in the bottom right and confirm you would like the queue to be deleted.